Ableton Live Instant Mappings for Korg microKONTROL
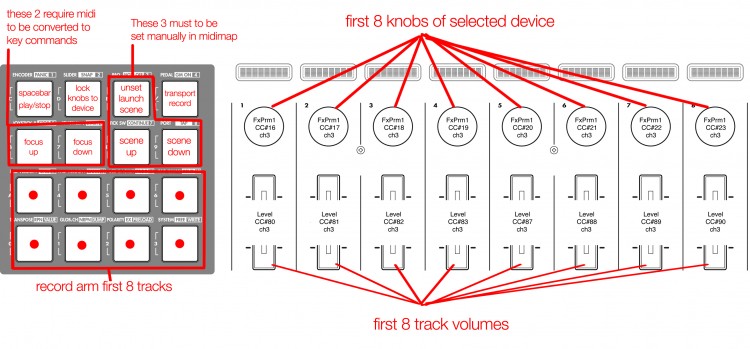
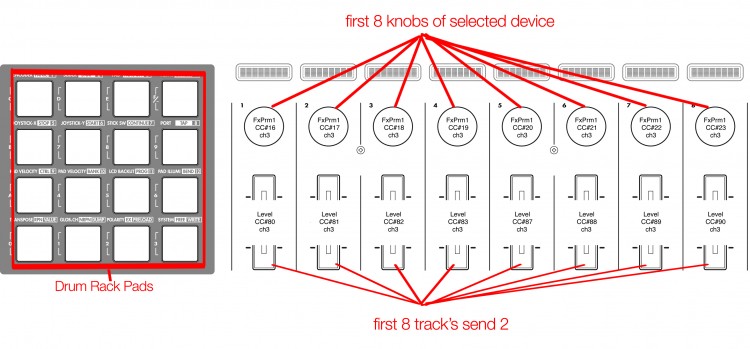
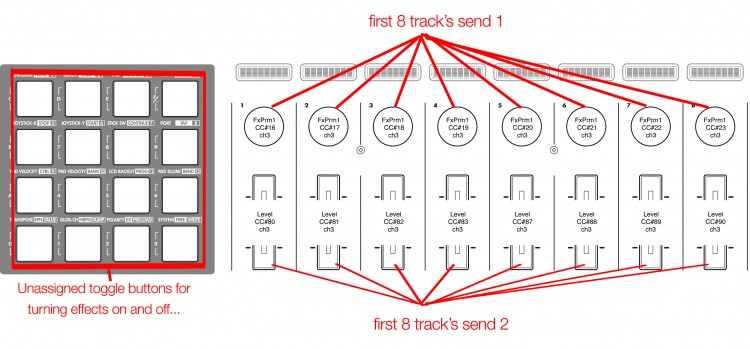
Posted on: April, 23, 2010, inI’ve spent many hours discovering how to instant map my Korg microKONTROL to Ableton Live using the UserConfiguration.txt file, MidiPipe(optional), and the Librarian software that comes with the microKONTROL. I have successfully mapped the first 3 scenes of my microKONTROL to control various parameters in Live without having to Map them manually in midi map mode. The reason I made this tutorial is because I wish I could have had access for something like this. Would have saved me all the time it took to put this together. Good skills to learn though. No time was wasted. Before I walk you through how to set it up the way I did, let me show you how I configured the first three scenes. That way you’ll know how to use it once you download my templates.
Scene 1 Transport Controls (this one is the most complex)
To assign the scene up, scene down, and scene launch buttons, go into midi map mode, and under stop all clips in session view you will see play, up and down buttons. Those are to midi assign scene controls. Just click on the play arrow and press the scene launch on the keyboard, and the same with up and down. 
Scene 2 Drum Rack Pads

Scene 3 Sends/Toggle Buttons
 Here’s how to get your own Korg microKONTROL mapped like this on the Mac. (sorry PC users..) Step 1 If you have things mapped to the same midi messages already, it will override the instant mappings. So, before you try to achieve instant mapping, you will want to start a new live set and delete all midi and key mappings. Then go ahead and create 4 audio tracks, 4 midi tracks, and 2 returns as well. Place a drum rack on each midi track, and load up a kit for testing. Here is my Instant Mapping Template Project for Live 8 users. Step 2 Download my Custom Korg microKONTROL Preset, open it in the Librarian software, and transmit the scenes to your midi keyboard. Step 3 Download my UserConfiguration.txt file, and navigate to the following location on your Mac: (sorry again PC users..) User/Library/Preferences/Ableton/Live (YOUR VERSION)/User Remote Scripts Create a folder in User Remote Scripts and name it CustomicroKONTROL or whatever you want. Copy my UserConfiguration.txt file into the new folder. Step 4 Open Live’s preferences and go to the Midi Sync tab. Under Control Surface at the top, choose from the drop down CustomicroKontrol at the very bottom of the list most likely. (It will be called CustomicroKontrol even if you didn’t name the folder that as the name is chosen in the config file.) Now, close preferences. Step 5 Download and open MidiPipe freeware for Mac. Also, download my preset I made that converts midi into keystrokes using applescript, and open it in MidiPipe. You can also map the buttons yourself using midiStroke if you’d prefer. That’s it! If you did everything right, you should have all the functionality shown in my keyboard illustrations. If you want to customize your korg midi mapping, you can edit the UserConfiguration.txt file, and also setup your own applescript in MidiPipe to perform key commands or keystrokes if you so choose. The trick with MidiPipes is to click on the Alist then hit a button or adjust a control on the keyboard. Then, the applescript will bring Ableton to the front automatically. Just click back to MidiPipe and the CC# of the control will show up in the AList. You can then enter that number and the number of the keystroke you want to perform into the Applescript code. There is another freeware called Full Key Codes that will give you the key number of the apple keyboard key you press. It’s a bit tricky. You can look at my example, and hopefully that will help you. Good Luck! If you found this information useful, please make a donation to help support development of such materials. Every bit helps keep this site up and running. Thanks for all your support!!!
Comments
Tags: Ableton Live Instant Mappings, Ableton UserConfiguration.txt for Korg microKONTROL, Korg microKONTROL Instant Mappings, Korg microKONTROL UserConfiguration.txt